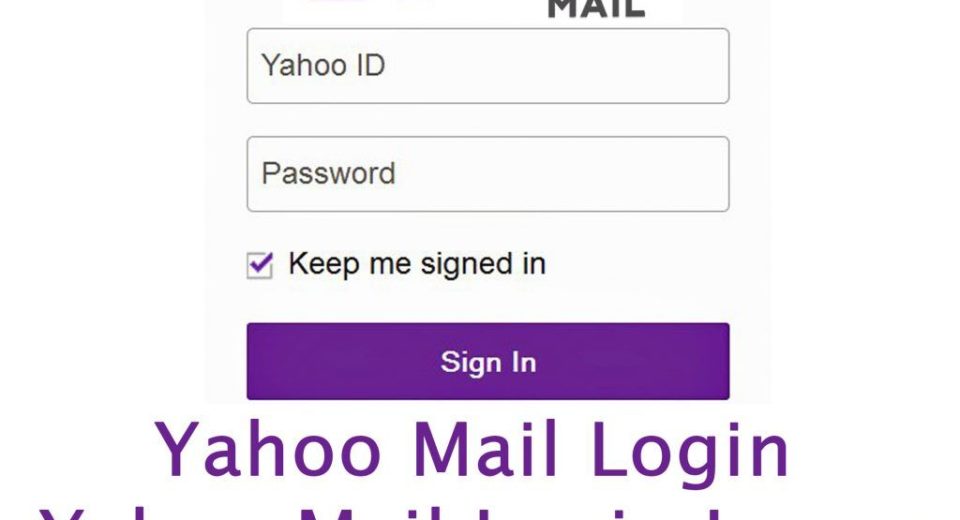
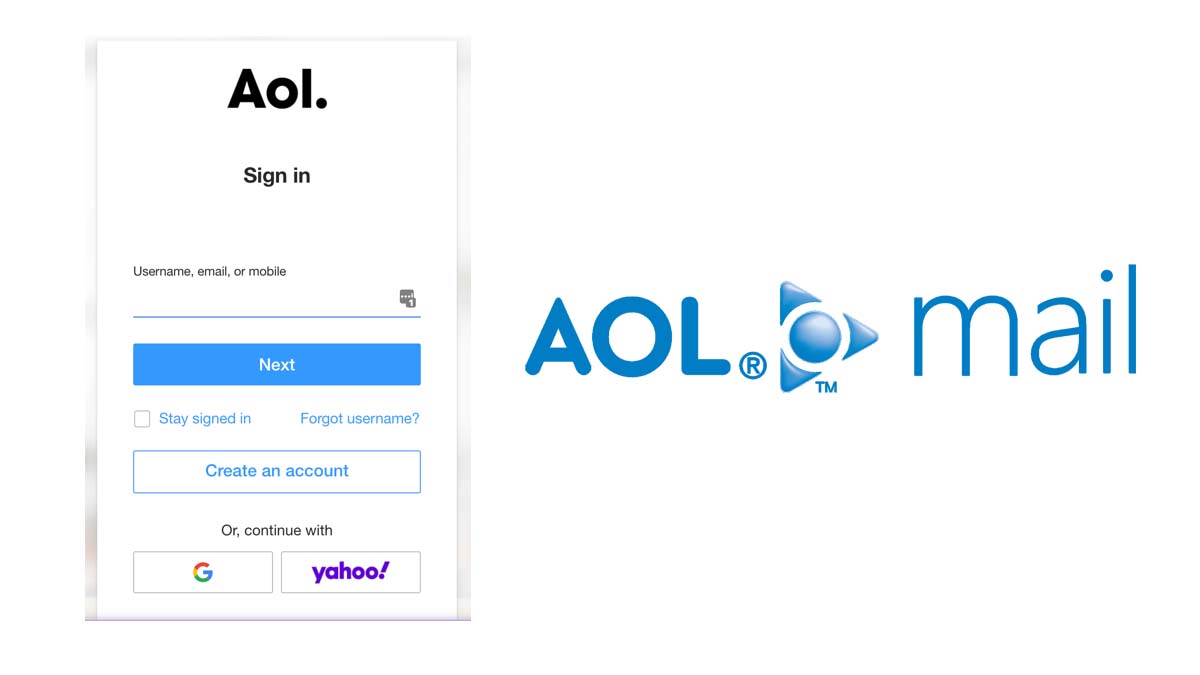
In today’s digital world, staying connected through email is crucial. If you rely on AOL Mail, navigating your inbox efficiently can save you time and keep you organized. This guide delves into everything you need to know about “My AOL Mail Inbox,” from accessing your account to managing emails like a pro.
What is My AOL Mail Inbox?
My AOL Mail inbox is your central hub for receiving, organizing, and managing all your emails sent through your AOL Mail account. It provides a user-friendly interface to access, read, compose, and reply to emails, ensuring smooth communication with your contacts. Access your AOL Mail inbox securely and easily. Learn how to sign in, manage your mail, and more.
Accessing My AOL Mail Inbox on Desktop
Open your preferred web browser. (e.g., Chrome, Firefox, Safari)
Follow the same login steps as outlined for desktop browsers.
Essential Features of My AOL Inbox
Inbox view: See a list of all your received emails, with the most recent appearing first.
Search bar: Locate specific emails by sender, recipient, subject line, or keywords.
Compose button: Create a new email message.
Folders: Organize emails using built-in folders like “Sent,” “Trash,” and “Spam,” or create custom ones.
Filters: Set up filters to automatically move emails based on sender, recipient, or keywords.
Settings: Personalize your inbox with themes, signatures, and notification preferences.
Managing Your My AOL Mail Inbox Effectively
Delete unwanted emails: Select and delete emails you no longer need.
Move emails to folders: Organize emails by category for easy retrieval.
Star important emails: Mark crucial emails for quick access.
Use labels: Add labels to categorize emails further.
Create folders for specific senders or topics.
Utilize filters to automatically organize incoming emails.
Troubleshooting Common Issues
Forgotten password:
Click on “Forgot password?” on the login page.
Follow the prompts to reset your password using your recovery email address or phone number.
Login problems:
Ensure you’re using the correct login credentials (username/email and password).
Check for typos or caps lock issues.
Clear your browser’s cache and cookies.
Try accessing your inbox from a different device or browser.
Spam filters:
Learn how to manage your spam filters in your AOL Mail settings to ensure important emails are not sent to spam.
By following these steps and referencing the troubleshooting tips, you should be able to access your My AOL Mail inbox with ease.
Frequently Asked Questions (FAQs)
How do I recover my forgotten password?
Visit the AOL sign-in page and click “Forgot Password?”. Follow the prompts to reset your password using your phone number or recovery email address.
Can I access My AOL Mail on my phone?
Absolutely! Download the “AOL Mail” app from the App Store or Google Play Store and sign in with your credentials.
How much storage does My AOL Mailoffer?
AOL Mail offers a generous 25GB of free storage for your emails and attachments.
Is My AOL Mail Inbox secure?
AOL Mail features spam and virus protection to safeguard your inbox from unwanted threats.
How do I block spam emails?
Go to Settings and navigate to “Spam settings.” You can mark emails as spam or add senders to your blocked list.
How can I ensure the security of my My AOL Mail Inbox?
Enable strong passwords and two-factor authentication for added security.
Be cautious of suspicious emails and avoid clicking on unknown links or downloading untrusted attachments.
Regularly update your AOL Mail app and web browser to benefit from the latest security patches.
How do I unsubscribe from unwanted emails?
Most email senders include an “unsubscribe” link at the bottom of their emails. Click on this link to opt out of receiving further emails from that sender.
Conclusion
Mastering My AOL Mail Inbox empowers you to manage your emails efficiently and stay organized. Embrace the features, personalize your experience, and conquer your inbox like a pro!
Do you need to sign into your Yahoo Mail inbox? If so, you’ve come to the right place. This article will walk you through the steps involved in Yahoo Mail Inbox Sign Into My Account, so you can get back to your emails as quickly as possible.
In today’s fast-paced digital world, staying connected is more important than ever. Yahoo Mail provides a reliable platform for seamless communication. The process of signing into your Yahoo Mail inbox is simple, and it ensure you never miss an important message. Whether you’re a seasoned user or new to the platform, we’ve got you covered on the Yahoo Mail Inbox Sign Into My Account.
Yahoo Mail is a widely used email service that provides a user-friendly platform for managing your emails efficiently. In this guide, we’ll walk you through the steps to sign in to your Yahoo Mail inbox and explore its features.
If you use a third-party app to access your Yahoo Mail, you can sign in using the app’s sign-in process to Yahoo Mail Inbox Sign Into My Account.
How to find your Yahoo Mail inbox
Once you’re logged in, you’ll find yourself in your Yahoo Mail inbox. Here are some key features to help you navigate the Yahoo Mail Inbox Sign Into My Account:
Sorting and Filtering Emails
Use the options at the top to sort your emails by date, sender, or subject. You can also set up filters to automatically categorize incoming messages.
Composing a New Email
Click on the “Compose” button to start a new email. Fill in the recipient’s email address, subject, and message, then click “Send” when you’re ready.
Managing Folders
On the left-hand side, you’ll find a list of folders. You can create custom folders to organize your emails based on your preferences.
How to use the features of the Yahoo Mail inbox
Yahoo Mail offers various customization options to personalize your inbox:
Changing Themes
Click on the gear icon in the top-right corner and select “Themes.” Choose from a range of themes to change the look of your inbox.
Setting Up Filters
Navigate to “Settings” > “More Settings” > “Filters.” Here, you can create filters to automatically sort incoming emails.
Adjusting Display Settings
In “Settings,” you can also customize the display density and inbox spacing to suit your preferences.
How to reset your Yahoo Mail password
There are two ways to reset your Yahoo Mail password:
From a desktop or mobile web browser:
Go to the Yahoo Account security page.
Click Change password.
Enter your current password and a new password.
Click Continue.
From most Yahoo mobile apps:
Tap the Menu icon.
If using the Yahoo Mail app, tap Manage Accounts.
Tap Account info.
Tap Security settings.
Enter your security code.
Tap Change password.
Tap I would rather change my password.
Enter a new password and its confirmation and tap Continue.
If you don’t remember your current password, you can still reset it by following the instructions on the Yahoo Sign-in Helper page. You can also contact Yahoo customer support for help.
How to recover Yahoo Mail Inbox Sign Into My Account
There are two ways to recover your Yahoo Mail account:
If you know your Yahoo ID and password:
Go to the Yahoo Sign-in page.
Enter your Yahoo ID and password.
Click Sign in.
If you forgot your Yahoo ID or password:
Go to the Yahoo Account recovery page.
Enter the information you know about your account, such as your Yahoo ID, email address, or date of birth.
Click Continue.
Follow the instructions to recover your account.
However, if you have a recovery mobile number or alternate email address associated with your account, you can use it to recover your account even if you don’t remember your password.
If you don’t have a recovery mobile number or alternate email address, or if you can’t recover your account using the above methods, you can contact Yahoo support for help.
How to manage your Yahoo Mail Inbox Sign Into My Account
Here are some ways to manage your Yahoo Mail account:
Change your password: You should change your password regularly, especially if you think it may have been compromised.
Enable two-factor authentication (2FA): 2FA adds an extra layer of security to your account by requiring a verification code in addition to your password when you sign in.
Set up a recovery email address and phone number: This will help you recover your account if you forget your password or if your account is compromised.
Review your spam and junk folders regularly: Phishing emails often end up in these folders, so it’s important to check them regularly.
Mark important emails as unread: This will help you keep track of important emails that you may need to refer to later.
Use filters to organize your emails: Filters can help you automatically sort your emails into different folders based on the sender, subject, or keywords.
Delete old emails: Old emails can take up a lot of space in your inbox, so it’s a good idea to delete them regularly.
Back up your emails: It’s a good idea to back up your emails regularly in case your account is hacked or your computer crashes.
You can manage your Yahoo Mail account by following these steps:
Sign in to your Yahoo Mail account.
Click the gear icon in the top right corner of the screen.
Select “Settings”.
Click on the tab that you want to manage. For example, to change your password, click on “Account Info”.
Make the changes that you want.
Click “Save”.
You can also manage your Yahoo Mail account from the Yahoo Mail app. To do this, open the app and tap on the three lines in the top left corner of the screen. Then, select “Settings”.
Troubleshooting guide for common Yahoo Mail Inbox Sign Into My Accountproblems
Forgot Your Password?
It happens to the best of us – forgetting our passwords. If this occurs, simply click on the ‘Forgot Password’ link on the login page. Follow the prompts to reset your password and regain access to your account.
Account Locked?
If you’ve attempted to login multiple times with incorrect information, your account may be temporarily locked for security reasons. Don’t panic! Follow the provided steps to unlock your account and regain access.
Contacting Support
If you’re still experiencing difficulties, reach out to Yahoo’s customer support for personalized assistance. They’re equipped to handle a wide range of login-related issues.
FAQof Yahoo Mail Inbox Sign Into My Account
How often should I update my password?
For optimal security, it’s recommended to update your password every three to six months.
Can I access my Yahoo Mail inbox on a mobile device?
Absolutely! Download the Yahoo Mail app from your device’s app store, and sign in using your account credentials for on-the-go access.
Is it possible to change my registered email address?
Yes, you can update your email address in the account settings section after logging in.
What should I do if I suspect unauthorized access to my account?
Immediately change your password and enable two-factor authentication for added security. Contact Yahoo support if the issue persists.
Can I use Yahoo Mail without an active internet connection?
Unfortunately, Yahoo Mail requires an internet connection for full functionality.
How can I recover deleted emails from my inbox?
Check your trash folder; deleted emails remain there for a specified period before permanent deletion.
Conclusion
Signing into your Yahoo Mail inbox is the first step towards seamless communication. By following our comprehensive guide, you’ll navigate the process effortlessly. Remember, security is paramount, so keep your login information confidential and updated regularly. Stay connected, stay informed, and enjoy the convenience of Yahoo Mail.
Are you wondering how to open your Gmail inbox messages? It’s actually quite simple. Just follow these easy steps below.
Managing your email efficiently is crucial. Gmail, being one of the most popular email platforms, offers a range of features to streamline your communication. One of the fundamental tasks is opening your inbox messages.
To open a Gmail inbox message, you can either click on the message in your inbox or you can use the search bar to find the message you’re looking for.
How to open your Gmail inbox messages
There are two ways to open your Gmail inbox messages:
On a computer:
Go to Gmail in your web browser.
Enter your Gmail email address and password.
Click Sign in.
Your inbox will open.
On a phone or tablet:
Open the Gmail app.
Sign in to your Gmail account.
Your inbox will open.
Once your inbox is open, you can start reading your messages. To open a message, click on the subject line.
How to open Gmail inbox messages on different devices
To open Gmail inbox messages on different devices, you can follow these steps:
Sign in to your Gmail account on each device.
In the top right corner of the Gmail inbox, click the gear icon to open Settings.
Click See all settings.
Click the Accounts and Import tab.
Under Accounts, click the name of the account that you want to open messages from on the other device.
Click Add another email address.
Enter the email address and password for the account that you want to open messages from on the other device.
Click Next.
Select the checkbox next to I want to be able to send mail as [email address].
Click Next.
Click Verify.
Follow the instructions in the email to verify the account.
Once you have verified the account, you can open Gmail inbox messages from that account on any device that you are signed in to.
Note: If you are using the Gmail app on your phone or tablet, you can also open messages from other accounts by tapping the Menu button (three horizontal lines) in the top left corner of the app and selecting Switch Accounts.
How to open Gmail inbox messages in different ways
There are many ways to open Gmail inbox messages in different ways. Here are a few of the most common methods:
Click the message. This is the most common way to open a Gmail inbox message. Simply click on the message that you want to open.
Double-click the message. This is another way to open a Gmail inbox message. Double-click on the message that you want to open.
Use the keyboard shortcuts. You can also use keyboard shortcuts to open Gmail inbox messages. The shortcut for opening a message is Ctrl+Enter (Windows) or Command+Enter (Mac).
Use the search bar. If you know the subject line or sender of the message that you want to open, you can use the search bar to find it. Once you have found the message, you can click on it to open it.
Use the labels. If you have organized your Gmail inbox messages into labels, you can use the labels to open the messages that you want. To do this, click on the label that contains the message that you want to open.
Use the filters. If you have created filters to organize your Gmail inbox messages, you can use the filters to open the messages that you want. To do this, click on the filter that contains the message that you want to open.
You can also open Gmail inbox messages in different ways by using the Gmail app on your phone or tablet. The specific methods that you can use will vary depending on the app that you are using.
How to open Gmail inbox messages from a different account
There are two ways to open Gmail inbox messages from a different account.
Method 1: Link your other account to Gmail
Sign in to your Gmail account.
In the top right, click Settings > See all settings.
Click the Accounts and Import tab.
In the Check mail from other accounts section, click Add a mail account.
Enter the email address of the other account and click Next.
Select Link account with Gmail (Gmailify) and click Next.
Follow the instructions on the screen.
Once your other account is linked to Gmail, you will be able to see its messages in your Gmail inbox.
Method 2: Import your other account’s messages into Gmail
Sign in to your Gmail account.
In the top right, click Settings > See all settings.
Click the Accounts and Import tab.
In the Import mail and contacts section, click Import mail and contacts.
Select the other account that you want to import messages from and click Next.
Follow the instructions on the screen.
Once your other account’s messages are imported into Gmail, you will be able to see them in a separate section of your inbox.
To view multiple Gmail accounts in one inbox
You can set up Multiple Inboxes. Here are the steps on how to do it:
Sign in to the Gmail account that you want to use as the primary account.
In the top right, click Settings > See all settings.
Click the Inbox tab.
Under Inbox type, select Multiple inboxes.
Click Customize.
In the Section name field, enter a name for each section.
In the Search criteria field, enter the search criteria for each section. For example, to create a section for starred emails, you would enter is:starred.
Click Save changes.
Once you have set up Multiple Inboxes, you will see a separate section for each account in your inbox. You can switch between accounts by clicking on the name of the account in the top left corner of the inbox.
How to open Gmail inbox messages with shortcuts
You can open Gmail inbox messages with shortcuts by turning on keyboard shortcuts in Gmail settings. Here are the steps on how to do it:
Go to Gmail.
In the top right, click Settings > See all settings.
Click the Advanced tab.
Under Custom keyboard shortcuts, select Enable.
Click Save changes.
Once you have turned on keyboard shortcuts, you can use the following shortcuts to open Gmail inbox messages:
G followed by I to go to the inbox.
J to open the next message.
K to open the previous message.
Enter to open the selected message.
Spacebar to toggle the message between open and closed.
You can also use keyboard shortcuts to perform other actions in Gmail, such as compose a new email, reply to an email, and delete an email. For a complete list of keyboard shortcuts, you can refer to the Gmail keyboard shortcuts: https://support.google.com/mail/answer/6594?hl=en documentation.
How to open Gmail inbox messages with filters
You can open Gmail inbox messages with filters by creating a filter that automatically labels the messages and then applying a filter action to open the labeled messages. Here are the steps on how to do it:
Go to Gmail.
In the search bar, enter the criteria for the filter. For example, to filter messages from a specific sender, you would enter from:sender@email.com.
Click Create filter.
In the Apply the filter to section, select the label that you want to apply to the filtered messages.
In the Actions section, select Open.
Click Create filter.
Once you have created the filter, all messages that match the filter criteria will be automatically labeled and opened.
There are a number of Gmail extensions that can help you open inbox messages. Here are a few of the most popular:
Checker Plus for Gmail: This extension shows you a panel of your unread emails in the top right corner of your browser window. You can click on any email in the panel to open it in Gmail.
Gmail Notifier: This extension sends you notifications when you receive new emails. You can choose to have the notifications appear as a pop-up, a sound, or a badge on your browser tab.
Gmail Labels: This extension allows you to create custom labels for your emails. You can then use these labels to filter and organize your emails.
Gmail Snooze: This extension allows you to snooze emails so that they reappear in your inbox at a later date. This can be helpful for emails that you don’t need to deal with right away.
Gmail Swipe: This extension allows you to swipe left or right on emails to quickly perform actions such as archive, delete, or mark as read.
To install a Gmail extension, you need to have the Google Chrome browser. Once you have Chrome installed, you can go to the Chrome Web Store and search for the extension that you want to install. Click on the extension and then click on the “Add to Chrome” button. The extension will be installed and added to your browser.
How to open Gmail inbox messages that are filtered or archived
There are a few ways to open Gmail inbox messages that are filtered or archived.
To open filtered messages:
In the Gmail search bar, enter the criteria for the filter. For example, to filter messages from a specific sender, you would enter from:sender@email.com.
Click Search.
The filtered messages will be displayed in the results.
Click on the message that you want to open.
To open archived messages:
On the left side of the Gmail interface, click All Mail.
The archived messages will be displayed.
Click on the message that you want to open.
You can also use keyboard shortcuts to open filtered or archived messages. The specific shortcuts will vary depending on your operating system.
How to open Gmail inbox messages in a new tab
There are two ways to open Gmail inbox messages in a new tab.
Method 1: Right-click and select “Open in new tab”
In Gmail, find the message that you want to open in a new tab.
Right-click on the message.
Select “Open in new tab” from the menu.
The message will open in a new tab in your browser.
Method 2: Use the keyboard shortcut
In Gmail, find the message that you want to open in a new tab.
Press Ctrl+Click on the message.
The message will open in a new tab in your browser.
The keyboard shortcut may vary depending on your operating system. For example, on a Mac, the keyboard shortcut is Cmd+Click.
How to open Gmail inbox messages in a fullscreen window
There are two ways to open Gmail inbox messages in a fullscreen window:
Open the message in a new tab and then maximize the tab
Click on the message you want to open.
Press Shift+Click on the message.
The message will open in a new tab.
Click on the maximize button in the top right corner of the tab.
Use the keyboard shortcut
Click on the message you want to open.
Press Ctrl+Shift+M.
The message will open in a fullscreen window.
If you want to open all Gmail inbox messages in fullscreen by default, you can do the following:
Go to Settings > See all settings.
Click the Inbox tab.
Under Reading pane, select Default to full screen.
Click Save changes.
Now, all Gmail inbox messages will open in fullscreen by default.
How to open Gmail inbox messages with apps
There are a few ways to open Gmail inbox messages with apps.
Use an email client
An email client is a software application that you can use to send and receive emails. Some popular email clients include Microsoft Outlook, Mozilla Thunderbird, and Apple Mail. To open a Gmail inbox message with an email client, you can follow these steps:
Open the email client.
Click on the Import or Add account button.
Select Gmail from the list of providers.
Enter your Gmail email address and password.
Click on the Sign in button.
Once your Gmail account is added to the email client, you can open any inbox message by double-clicking on it.
Use a web browser extension
There are a number of web browser extensions that allow you to open Gmail inbox messages with other apps. One popular extension is called Gmailify. To use Gmailify, you can follow these steps:
Install the Gmailify extension in your web browser.
Click on the Gmailify icon in your web browser toolbar.
Select the app that you want to use to open Gmail inbox messages.
Follow the instructions in the extension to connect your Gmail account to the app.
Once your Gmail account is connected to the app, you can open any inbox message by clicking on the app icon in the extension.
Use a Google Workspace add-on
If you are using Google Workspace, you can use a Google Workspace add-on to open Gmail inbox messages with other apps. One popular add-on is called Gmail Compose. To use Gmail Compose, you can follow these steps:
Install the Gmail Compose add-on in your Google Workspace account.
Click on the Gmail Compose icon in your Google Workspace toolbar.
Select the app that you want to use to open Gmail inbox messages.
Follow the instructions in the add-on to connect your Gmail account to the app.
Once your Gmail account is connected to the app, you can open any inbox message by clicking on the app icon in the add-on
How to open Gmail inbox messages with troubleshooting tips
To open Gmail inbox messages, you can follow these steps:
Go to Gmail in your web browser.
Sign in to your Gmail account.
Click the Inbox tab.
Click on the message you want to open.
If you are unable to open your Gmail inbox messages, here are some troubleshooting tips:
Make sure that you are signed in to the correct Gmail account.
Check your internet connection.
Clear your browser’s cache and cookies.
Try using a different browser.
If you are using a mobile device, make sure that you have the latest version of the Gmail app installed.
If you are still unable to open your Gmail inbox messages, you can contact Gmail support for help.
How to bulk open your Gmail inbox messages
Unfortunately, there is no way to bulk open Gmail inbox messages in the Gmail web interface. However, you can use a third-party extension to do this. One popular extension is called Gmail Bulk Opener. To use Gmail Bulk Opener, you can follow these steps:
Install the Gmail Bulk Opener extension in your web browser.
Click on the Gmail Bulk Opener icon in your web browser toolbar.
Select the messages that you want to open.
Click on the Open button.
The messages will open in new tabs.
How to find specific messages in your Gmail inbox
There are a few ways to find specific messages in your Gmail inbox.
Use the search bar. The search bar is located at the top of your Gmail inbox. You can enter any keywords or phrases that you think might be in the message that you are looking for. For example, if you are looking for a message from your boss, you could enter “boss” in the search bar.
Use the search filters. The search filters are located below the search bar. You can use these filters to narrow down your search results. For example, you could filter by date, sender, or label.
Use search operators. Search operators are special keywords that you can use to further refine your search. For example, you could use the operator “is:unread” to find all unread messages.
Here are some of the most common search operators:
is:unread – Finds unread messages.
is:starred – Finds starred messages.
from: – Finds messages from a specific sender.
to: – Finds messages sent to a specific recipient.
subject: – Finds messages with a specific subject line.
body: – Finds messages that contain a specific word or phrase.
on: – Finds messages received on a specific date.
after: – Finds messages received after a specific date.
before: – Finds messages received before a specific date.
You can combine search operators to create even more specific searches. For example, you could use the following search operator to find all unread messages from your boss:
How to delete messages from your Gmail inbox
There are two ways to delete messages from your Gmail inbox:
Delete individual messages:
Open the Gmail inbox.
Select the messages you want to delete. You can select multiple messages by clicking on the checkbox next to each message.
Click the Delete button.
A confirmation pop-up window will appear. Click OK to delete the messages.
Delete multiple messages:
Open the Gmail inbox.
Type a search term in the search bar to filter the messages you want to delete. For example, you can type “unsubscribe” to delete all the emails from mailing lists you’ve unsubscribed from.
Check the box next to the messages you want to delete.
Click the Delete button.
A confirmation pop-up window will appear. Click OK to delete the messages.
To permanently delete messages from your Gmail account, you need to empty the Trash folder. You can do this by following these steps:
Go to the Trash folder.
Click the Empty Trash now button.
A confirmation pop-up window will appear. Click OK to empty the Trash folder.
Note that emails in the Trash folder will be deleted permanently after 30 days.
The website www.bigpond.com.au webmail login is no longer active. Telstra has phased out Bigpond email accounts and is now advising users to obtain Microsoft 365 licenses as a replacement for their Bigpond emails.
If you still have a Bigpond email account, you can still access it by going to the Telstra website and logging in to your My Telstra account. Once you are logged in, you will see a link to “Webmail”. Click on that link and you will be able to access your Bigpond email account.
However, it is important to note that Telstra will eventually stop supporting Bigpond email accounts. So, if you want to continue using your Bigpond email address, you should consider switching to Microsoft 365.
To switch to Microsoft 365, you can contact Telstra customer support. They will be able to help you set up a Microsoft 365 account and transfer your email from your Bigpond account.
How to login to your BigPond webmail account
Just like I stated earlier, you can no longer access the www.bigpond.com.au webmail login to log in to your BigPond webmail account.
The Telstra website is now the official website where all account owners of BigPond webmail can access and manage their email.
Here are the steps on how to login to your Bigpond email account via the Telstra website:
Go to the Telstra website.
Click on the “Sign in” button in the top right corner of the page.
Enter your Telstra ID and password.
Click on the “Sign in” button.
Once you are logged in, you will see a link to “Webmail”. Click on that link.
You will be redirected to the Telstra webmail login page.
Enter your Bigpond email address and password.
Click on the “Sign in” button.
You will then be able to access your Bigpond email account.
Troubleshooting guide for common login problems
Here are some common Bigpond webmail problems and their troubleshooting steps:
I can’t access my email
Check your internet connection. Make sure you are connected to the internet and that your browser is up to date.
Try logging in to your email from a different device or browser.
Check your email address and password. Make sure you are entering them correctly.
If you are still having trouble, contact Telstra customer support.
I can’t see my emails
Check your spam folder. Your emails may have been marked as spam.
Clear your browser’s cache and cookies. This can sometimes fix problems with loading web pages.
Try logging in to your email from a different device or browser.
If you are still having trouble, contact Telstra customer support.
My emails are not sending
Check your email settings. Make sure your outgoing mail server is correct.
Try sending a test email to yourself.
If you are still having trouble, contact Telstra customer support.
I am getting error messages
Make sure you are entering the correct information.
Try logging in again.
If you are still having trouble, contact Telstra customer support.
Comparison of different webmail providers
Feature
Bigpond Webmail
Gmail
Yahoo Mail
Outlook.com
Storage
10 GB
15 GB (free); 100 GB to 2 TB (paid)
1 TB
15 GB (free); 100 GB to 2 TB (paid)
Attachment limit
25 MB
25 MB (10 GB per file via Google Drive)
25 MB
25 MB
Supported languages
13
100+
90+
100+
Conversation threading
Yes
Yes
Yes
Yes
Yes
POP3 and IMAP support
Yes
Yes
Yes
Yes
Yes
SMTP support
Yes
Yes
Yes
Yes
Yes
Security features
TLS/SSL encryption, two-factor authentication
Mobile apps
Yes
Yes
Yes
Yes
Yes
Web interface
Yes
Yes
Yes
Yes
Yes
Customer support
24/7 phone and email support
How to use the advanced features of BigPond webmail
BigPond webmail has a number of advanced features that you can use to manage your email more effectively. Here are a few of them:
Snooze emails
This feature allows you to temporarily hide an email so that you can come back to it later. To snooze an email, click on the Snooze button. You can choose to snooze the email for a specific amount of time, or until a specific date.
Read receipts
This feature allows you to track when your emails are opened and read. To enable read receipts, go to Settings > General and select the Request read receipts checkbox.
Undo sent email
This feature allows you to undo the sending of an email if you accidentally send it to the wrong person or if you make a mistake in the email. To use this feature, click on the Undo button immediately after sending the email.
Send email later
This feature allows you to schedule an email to be sent at a later time. To use this feature, click on the Send later button when composing an email. You can choose to send the email immediately, or you can choose a specific date and time for the email to be sent.
Filter emails
This feature allows you to automatically sort your emails into different folders based on criteria such as sender, recipient, subject, or keywords. To create a filter, go to Settings > Filters.
Signature
This feature allows you to add a signature to the bottom of your emails. A signature can include your name, contact information, or any other text that you want to include. To create a signature, go to Settings > Signature.
These are just a few of the advanced features that are available in BigPond webmail. To learn more about these features, or to find other advanced features, please refer to the BigPond webmail help documentation.
Please note that Telstra is phasing out BigPond webmail and advising users to obtain Microsoft 365 licenses as a replacement for their BigPond emails. If you are still using BigPond webmail, I recommend that you start planning to migrate your emails to a different email provider.
How to protect your BigPond webmail account from hackers
Use a strong password: Your password should be at least 12 characters long and include a mix of upper and lowercase letters, numbers, and symbols. Do not use the same password for your BigPond webmail account as you use for other online accounts.
Enable two-factor authentication (2FA): 2FA adds an extra layer of security to your account by requiring you to enter a code from your phone in addition to your password when you sign in.
Be careful about clicking on links in emails: Hackers often send emails that contain malicious links. If you receive an email from someone you don’t know, don’t click on any links in the email.
Keep your software up to date: Software updates often include security patches that can help protect your computer from malware. Make sure to install software updates as soon as they are available.
Use a firewall: A firewall can help protect your computer from unauthorized access.
Use antivirus software: Antivirus software can help scan your computer for malware.
Be careful about what information you share online: Don’t share your personal information, such as your password or credit card number, online unless you are sure that the website is secure.
If you think your BigPond webmail account has been hacked, change your password immediately: If you think your account has been hacked, change your password immediately and contact BigPond support.
How to use BigPond webmail on mobile device
To use BigPond webmail on your mobile device, you can use a web browser such as Safari, Chrome, or Firefox. Here are the steps on how to do it:
Open your web browser and go to the BigPond webmail website.
Enter your BigPond username and password.
Click on the Log in button.
Your inbox will open. You can start reading and sending emails.
How a business used BigPond webmail to improve their communication
BigPond webmail is a popular email service that can be used by businesses to improve their communication. Here are some specific examples of how businesses have used BigPond webmail to improve their communication:
A small business used BigPond webmail to create a shared inbox for all of its employees. This allowed employees to easily collaborate on projects and share information.
A large enterprise used BigPond webmail to set up a system of email aliases for its employees. This allowed employees to have separate email addresses for different purposes, such as customer service or marketing.
A non-profit organization used BigPond webmail to create a system of email lists for its members. This allowed the organization to easily communicate with its members about upcoming events and other important information.
A school used BigPond webmail to set up a system of email accounts for its students and teachers. This allowed students and teachers to communicate with each other and with the school administration.
Others
These are just a few examples of how businesses have used BigPond webmail to improve their communication. By using BigPond webmail, businesses can:
Improve collaboration: BigPond webmail allows employees to easily collaborate on projects and share information. This can help businesses to be more productive and efficient.
Improve communication with customers: BigPond webmail can be used to create a system of email aliases for customer service or marketing purposes. This can help businesses to provide better customer service and to reach out to their customers more effectively.
Improve communication with employees: BigPond webmail can be used to create a system of email lists for employees. This can help businesses to communicate important information to their employees more effectively.
Improve communication with the public: BigPond webmail can be used to create a system of email accounts for the public. This can help businesses to communicate with their customers and the public more effectively.
Overall, BigPond webmail is a powerful tool that can be used by businesses to improve their communication. By using BigPond webmail, businesses can be more productive, efficient, and customer-focused.
www.bigpond.com.au webmail login password reset
To reset your Bigpond webmail password on www.bigpond.com.au webmail login, you can follow these steps:
Go to the Bigpond webmail website.
Click on the Forgot password? link.
Enter your Bigpond username or email address.
Click on the Submit button.
You will receive an email from Bigpond with a link to reset your password.
Click on the link in the email.
Enter a new password and confirm it.
Click on the Reset password button.
Your password will be reset and you will be able to log in to your Bigpond webmail account using your new password.
www.bigpond.com.au webmail login not working
Check the Bigpond webmail status page: The first thing you should do is check the Bigpond webmail status page to see if there is an outage. If there is an outage, you will need to wait until it is fixed.
Check your internet connection: Make sure that you are connected to the internet and that your internet connection is working properly. You can try restarting your modem and router.
Try using a different web browser: If you are using a web browser that is not compatible with Bigpond webmail, try using a different web browser. Some popular web browsers that are compatible with Bigpond webmail include Chrome, Firefox, and Edge.
Clear your browser’s cache and cookies: Sometimes, clearing your browser’s cache and cookies can fix problems with websites. To do this, follow the instructions for your specific browser.
Contact Bigpond support: If you have tried all of the above and you are still having trouble accessing your Bigpond webmail account, you can contact Bigpond support for help.
FAQ page about www.bigpond.com.au webmail login
What is Bigpond webmail?
Bigpond webmail is an email service provided by Telstra, an Australian telecommunications company. It allows users to send and receive emails, create folders, and manage their inbox.
How do I log in to Bigpond webmail?
To log in to Bigpond webmail, go to the Bigpond webmail website and enter your username and password. Your username is your email address, and your password is the one you set when you created your account.
What if I forgot my username or password?
If you forgot your username or password, you can reset it by clicking on the “Forgot password?” link on the login page. You will need to enter your email address and Bigpond will send you a link to reset your password.
What if I am still having trouble logging in?
If you are still having trouble logging in, you can contact Bigpond support for help.
What is the difference between Bigpond webmail and Telstra Mail?
Bigpond webmail is the old email service provided by Telstra. Telstra Mail is the new email service that replaced Bigpond webmail. Telstra Mail offers more features and storage space than Bigpond webmail.
What is the email address ending for Bigpond webmail?
The email address ending for Bigpond webmail is @bigpond.com.au.